Kiuas 2020

Ten years ago, 2010, I blogged about the new kiuas (stove) for our sauna, Harvia Figaro. Just before Christmas this year, this kiuas broke down. There was an electric failure (the junction box of kiuas basically exploded, there was an electric short circuit), and I am not an engineer enough to say whether some underlying failure in stove itself was the reason, or just the weakly designed connections in the junction box failing over time. Luckily our circuit breakers worked just fine – we just missed one fundamental Finnish tradition: joulusauna.

Looking inside the Harvia after 10 years of use was eye-opening. The heater elements (lämpövastukset) of kiuas were pretty much gone. Also, we could not really completely trust the controller, timer and other electronics inside Harvia after the dramatic short circuit. So I decided to get a new kiuas.

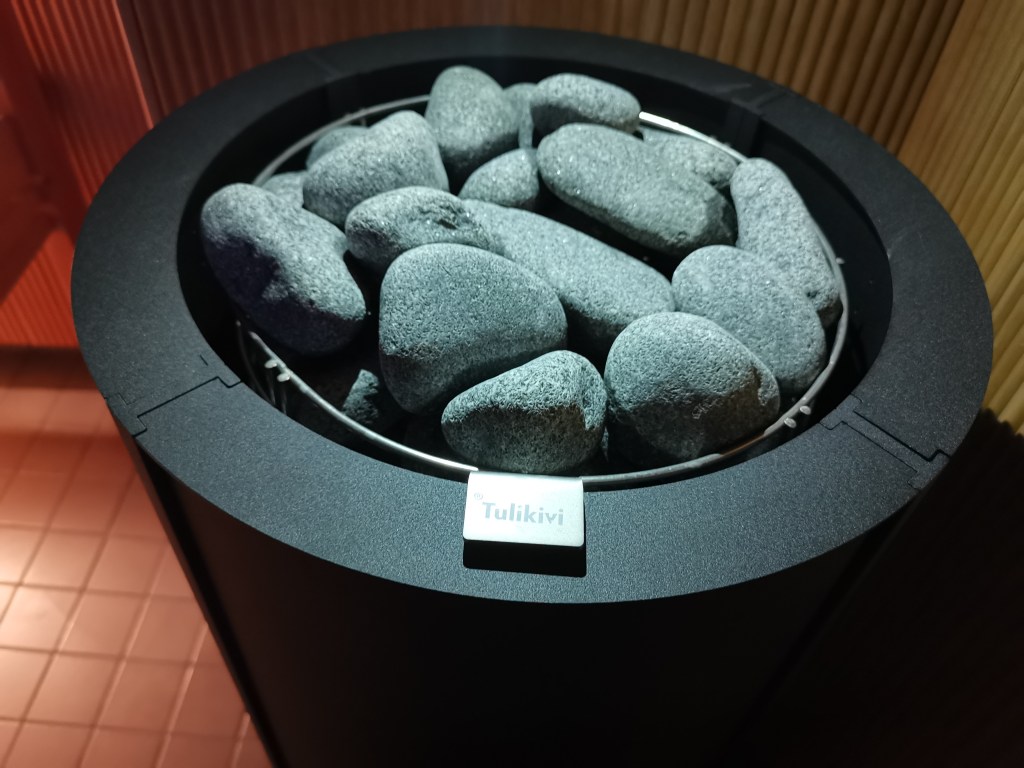
After some careful examination and discussion about the needs and priorities of our family, the choice was Tulikivi Sumu ST 9 kW model. This is specced for a 8-13 m³ sauna room, so hopefully it would be suitable for our case. (More, see: https://www.tulikivi.fi/tuotteet/Sumu_ST .)

The working class hero. – The sad final state of our Harvia Figaro, FG90.

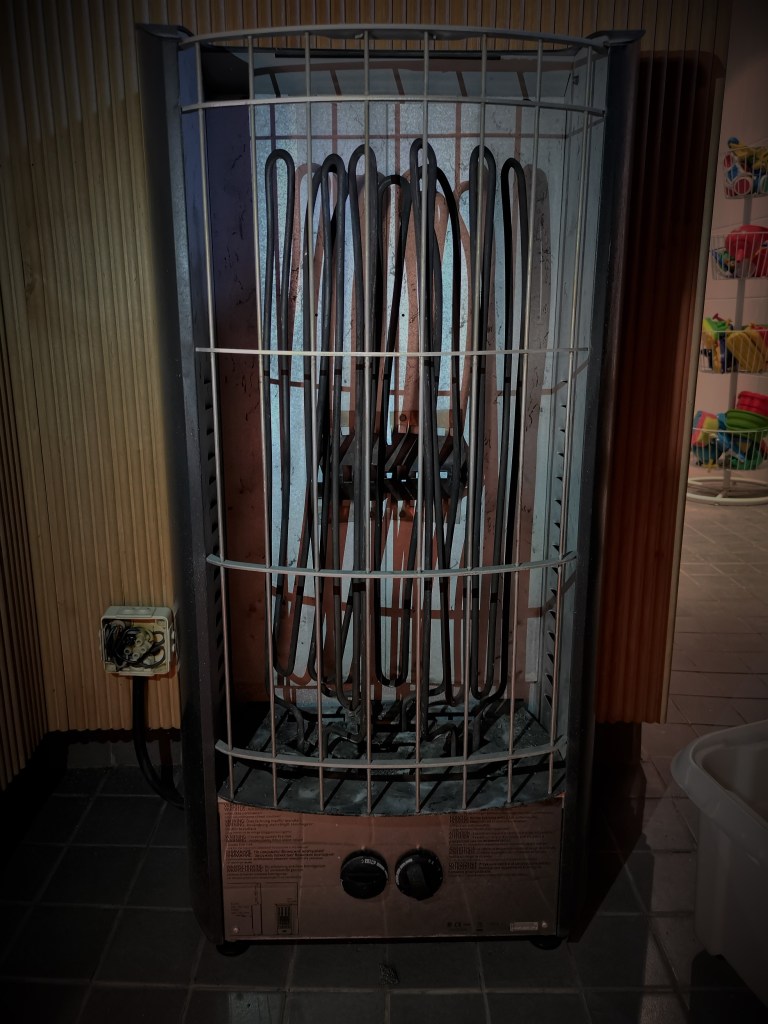
One of the lessons from Harvia was that a long construction with an open side that exposes the stones is challenging: the small stones can easily even squeeze out through the steel bars, and the tall heater elements become strained among the moving stones. I blame myself for not being diligent enough to take the stones out at least a few times per year, washing them, and then putting them back – the heater elements would no doubt stayed in better shape and the entire kiuas maybe even lived longer that way. At the same time, it must be said that positioning stones among the heater elements inside a kiuas that is 94 cm deep, is hard. The inside edges or rim of the steel box were so sharp in Harvia Figaro, that it was bit painful to squeeze your hand (and stones) deep inside kiuas. And this kiuas took maximum amount of 90 kg of stones. This sounded great when we got it (in theory at least, a massive kiuas gives more balanced “löyly” – the experience derived from such elements as right temperature, the release of steam and the atmosphere), but in the end this design was one of the reasons we did not maintain the kiuas in the manner it should have been done (we did of course change the stones, but probably not as often as it should have been done).

The new kiuas, Tulikivi Sumu, is also rather tall, but the external dimensions hide the fact that Tulikivi relies on dual-casing construction: there are isolating cavities inside kiuas, and this model only takes 60 kg of stones (rather than 90 kg of Harvia Figaro). Together with the smaller internal dimensions, this is clearly easier kiuas to handle and maintain.

We also (of course) always use a professional electrician to install a kiuas. This time, the installed, new junction box was also a more sturdy and hopefully electrically safer and more durable model.

Our new Tulikivi Sumu ST, black 9 kW model.

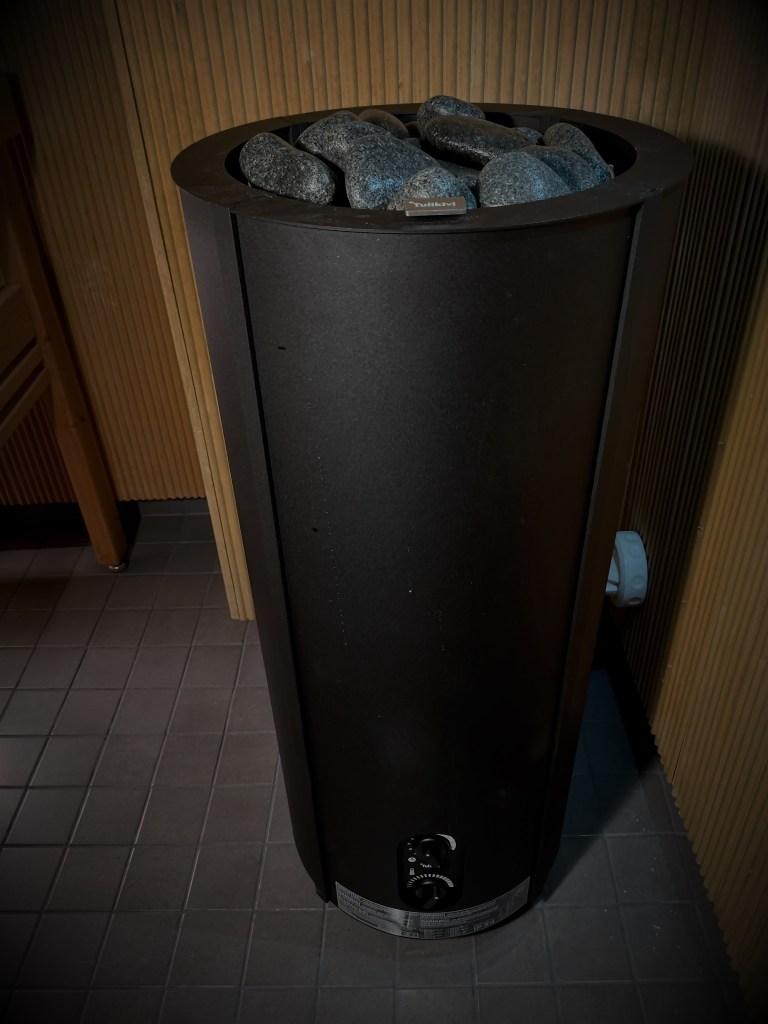
The dual shell casing of Tulikivi means that it is also safer – this is something that the company also advertises, alonside with their expertise in traditional soapstone stoves (vuolukivi – they are based in Nunnalahti, Juuka, North Karelia). The outer surfaces of this stove get warm, but they do not get so hot that you would get burns, if you touch it while it is heating. Btw, this also means that the safe distances to wooden seats (lauteet) or walls can be very small. One could even integrate this kiuas inside lauteet, having the top of kiuas with its hot stones sticking out among the people sitting in lauteet. We are not going for that option, though.

One thing that I really tried to do carefully this time was positioning of the kiuaskivet – stones of the stove. I have become increasingly aware that you should not just randomly throw stones into the electric stove, and hope that kiuas would give good löyly – or that it would even be safe.

The instruction manual of Tulikivi even explitly says that their warrantly will be void, if the stones are positioned wrongly, and that if stones are too tightly or too loosely positioned, it can even cause fire.

The basic idea is that there should always be enough air cavities inside a kiuas, but also that the electric heater elements are not bare at any point. There should be a sort of internal architecture to the kiuaskivet: one needs to find large stones that fit in and work as supports in larger spaces, flat stones that are like internal “support beams”, taking the weight and supporting those stones that will come on the next layer. The weight of stones should not be focused on the heater elements, as otherwise they will become twisted and deformed under pressure. There should also be air channels like internal chimneys that allow hot air to move upwards, and transfer the heat from the heater elements into the kiuaskivet (stones) and also into the air of sauna room.

Positioning the rough-cut olivine diabase rocks on top of each other, trying to create a suitable labyrinthine, yet also solid internal structure inside the kiuas.

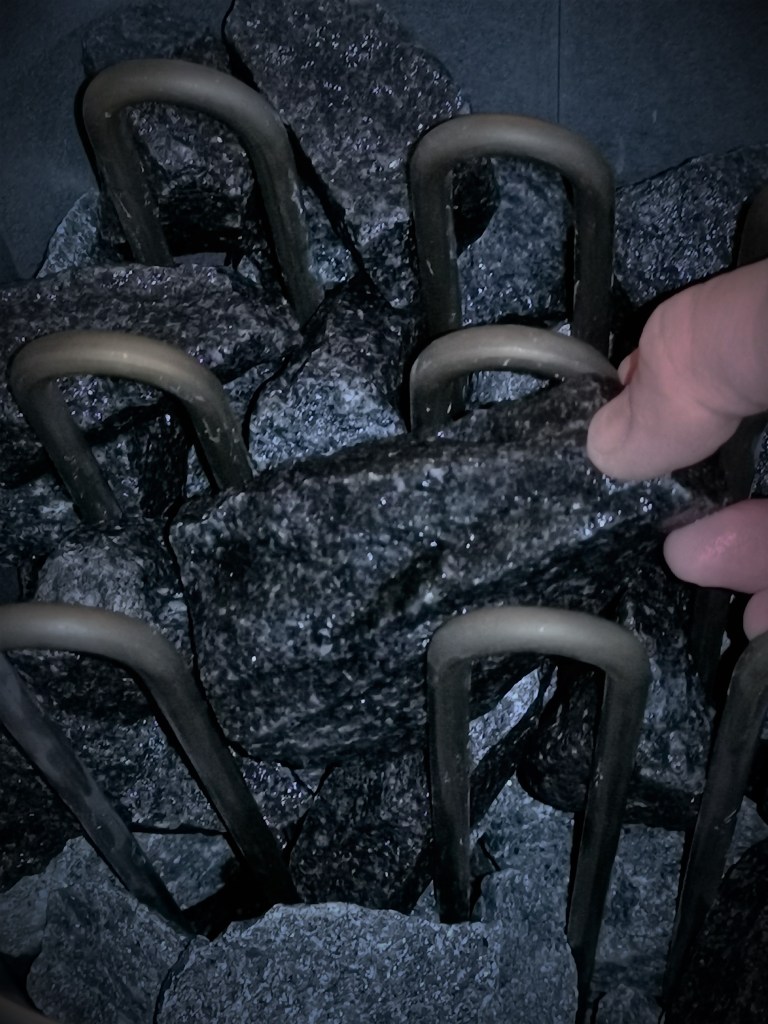
We use olivine diabase as the sauna stones – this is what Tulikivi also recommends. This is a rather durable and heavy rock material, meaning that it will not break under temperature change strains quickly, and since it is a heavy stone, it will also store and release heat. We use also small number of rounded olivine diabase stones at the top of kiuas. This is mostly for decorative purposes, even if some experts claim that rounded stones will also spread löylyvesi (water you throw into kiuas in Finnish sauna to get löyly), as water flows smoothly from rounded stones, end up deeper inside kiuas, and thereby produce more smooth löyly.

It should be said that selection of löylykivet, their positioning, and all such details of “sauna-knowhow” are subjects of endless passionate debates among the Finns. You can go e.g. into this good site (use the Google Translator, if needed) and read more: https://saunologia.fi/kiuaskivet/ .

Now, we’ll just need to take care of those lauteet, too. – Meanwhile: Hyviä löylyjä!

Ensimmäisiä löylyjä odotellessa…

Hydroponics, pt. 2

Short update again on chilies and hydroponics (apologies): my current work on this is focused on three areas. Firstly, I have been trying to figure out what growing method (or sub-method) to use. As I wrote earlier, there are reasons why ‘passive hydroponics’ looks like the best in my case. There are different ways of implementing this, though. Understanding in advance e.g. the risks associated in algae growth, over- (or under-) fertilisation, and pests in passive hydroponics appears to be important. As contrasted with growing in soil, the basic situation with nutrients is very different. In principle the hydroponic growing should be free of many risks coming with soil (less risk of pests and plant diseases, no need for pesticides, etc.) However, a hydroponic farmer needs to be bit of a scientist, in that you need to understand something about physics, chemistry and some (very basic) bioengineering. The choice of growing medium (substrate) is important as in passive hydroponics one should get enough moisture (water) to the plant roots without suffocating them – thus, the material needs to be neutral (no bio-actives or fertilisers by its own), porous and spongy enough to hold suitable amounts of water when irrigated, but also get dry enough so that air can get to the roots in-between drenching.

Secondly, I have been looking into the technical solutions for implementing the hydroponic growing environment. As I wrote, I have considered building my own ‘hempy bucket’ system. However, I kept thinking about root rot, fungus and other risks: in this kind of bucket system, there is always some fertilising liquid just standing in the water reservoir. The standing water provides ideal conditions for algae growth. Stagnate water system can cause lack of oxygen; build-up of salts and decomposing algae can produce toxins. I am not sure how significant those risks are (there are many hempy bucket gardeners who appear perfectly happy with their low-cost systems), but currently I am inclining more towards a commercial passive hydroponics system that also includes some kind of water valve: the idea here is, that the water valve will allow automatic, periodic watering of the growing media (and the root system), but also flush the water away as completely as possible, so that no similar stagnate water reservoir would be in the pots, as in the hempy bucket option. There are at least two models that are widely available and used: AutoPot and PLANT!T GoGro. I am not sure if there is much fundamental different between these two – GoGro appears to be more widely available to where I am living, but some gardeners appear to consider AutoPot (the original, older system) as more robust and a bit more sophisticated.

LED strip (Nelson Garden 23W).

Thirdly, I need to find a plant light solution that works. Currently, the tiny seedlings can nicely fit below the small LED plant light system that I have been long using. However, doing some hydroponic gardening indoors (before the greenhouse season starts) means that I need to be ready to provide enough, and right kinds of light for growing plants. We had an old fluorescent tube lamp, left from Laura’s old aquarium. That lamp was, however, too large and heavy for my needs, and I was also a bit suspicious how safe (in electronic terms) a 10+ year-old lamp setup would be today. Some chili gardeners appear to be using rather expensive, “hi-fi lamps” where different high-intensity discharge lamps (HIDs) have taken over from older incandescents and fluorescent tube lamp systems. Ceramic metal halide lighting and full-spectrum metal halide lighting are used to create powerful light with large amounts of blue and ultraviolet wavelengths that are good for plant growth. The price of good lamps of this kind can be rather high, however. I decided to go for a lightweight but plant-optimised LED system that was a comparably budget-friendly option. I am now setting up four 23W LED strips that were sold as Nelson Garden LED plant light (No.1 and No.2 systems use the same power transformer). Each LED strip is 85 cm long, is specified for 6400 K light temperature, and should provide 2200 lumen, or, more precisely, PPFD (100 mm) 570 µmol/s/m² of lighting power. Having four of those should be enough for four AutoPot style chili growing stations, at least in the early phases of gardening, I think. I am still thinking about how to suspend and adjust these LED strips to correct height above the plants. I am doing this pre-growing phase in my home office corner, in the basement, and e.g. the ceiling panels do not allow attaching anything into them.

Measuring the nutrients.

Finally, the choice of growing medium has also an effect on the style of fertilisers to use, and most hydroponic gardeners invest to both EC and pH meters and adjustment solutions, in order to control the salts and acidity levels in the nutrient solution, and to adjust the values in different stages of growth, bloom and fruit production. Some do not take this so seriously, and just try to follow some fertiliser manufacturer’s guidelines and make no measurements at all, just trying to monitor how plants look like. Some study this very scientifically, measuring and adjusting various nutrients, starting from the “key three”: Nitrogen (N), Phosphorus (P) and Potassium (K), which are commonly referred to as the fertilizing products’ NPK value. All these three are needed: nitrogen boosts growth, phosphorous is needed by plant for photosynthesis, cell communication and reproduction; and potassium is crucial for plant’s water regulation. But there are also “micronutrients” (sometimes called “trace elements”) that are needed in smaller amounts, but which still are important for healthy growth – these include, e.g. magnesium. Popular fertilisers for hydroponic gardening often come in multiple components, where e.g. the mixtures for growth, bloom and then the micronutrients are sold and apportioned separately. It is possible to find quite capable all-in-one fertiliser products, however. I am currently planning of using coco coir (neutral side-product of coconut manufacturing) as the growing medium, so I picked “Canna Coco A+B” by Canna Nutrients as my starting hydroponic fertiliser solution. I also bought a simple pH tester for checking the acidity of fertilising solution, and I probably should also invest in a reliable EC meter, at some point. The starting solution for seedlings should be very mild in any case, to avoid over-fertilising.

Testing the pH of our tap water.

Chili season 2018, pt. 2

Since mid-January, when I did my chili planting this year, there has been some nice progress. All five varieties that focused on have made it to the stage where they are soon ready to move into bigger, mid-sized pots. Particularly when the small seedlings were moved from the tiny, Ikea cultivation pots into larger ones, and provided some fresh soil for their roots, they really started growing. (I think that I have been using both “Biolan Kylvö- ja Taimimulta” and “Kekkilä Taimimulta” this year.) The hydroponics is no doubt better for larger, production oriented growing of chilies, but for me at least the traditional soil-based growing has proved much easier to handle.

Here are a couple of photos from this stage. The bigger of two Naga Morich plants is already over 15 cm mark, and has been moved into a bigger pot: this one is one from Finnish Orthex, and is called “Eden bioplastic herb pot” (there is a small water storage at the bottom, and the pot also comes with a felt mat, that can be used if this pot is applied to keep store-bought herbs alive).

Naga Morich (C. chinense), mid-April 2018

Most of the other plants are in the c. 10 cm range, below is pictured 7pot Primo Orange:

7pot Primo Orange (C. chinense), mid-April 2018

It will be interesting to see how the plants take the change, first into the windowsill with bright sunlight (they have grown under the Ikea Växer led lights), then into the greenhouse. The spring has been very late this year, and there is still snow and ice everywhere, and nights go well below freezing. But I’d think in May, latest, these will move into the greenhouse.

Chilli crops, preparing and dehydrating, greenhouse project

My chillies are producing chillies – of many varieties, and enough for any reasonable uses I can personally come up with. Here are again some photos, both of ripe and fresh chillies, and also about the preparation for preservation. I have decided to dry and make rough, spicy powders of two most high-yielding chilli varieties, Fire Flame and Thai Rawit. Those should be good for hot pots, curries and other similar uses. Those selected chillies that have provided only small number of fruit, I decided to freeze as whole. Dropping a thawed chilli into a meal is an optional use for those. My dehydrator is a cheap “House” model from local Prisma department store, but it has quiet operation, nice temperature controls and appears to do it job well enough. Slicing chillies for dryer takes its time, but has also somewhat meditative character.

Greenhouse: container for growing bags

Today another key element for our greenhouse was completed. Tomatoes will be cultivated in Biolan brand growing bags (“kasvusäkki”), and our DIY version involves preparing containers that include water tanks and soil-filled pipes that connect the growing bags with the water reservoir. The setup is completed with spiral-shaped, aluminium supports of Juliana that help tomatoes to grow upwards.
image

image

image

image

image

image

image

image

image

image

Greenhouse: the heater

Yesterday, the heater for our greenhouse finally arrived and we can now actually keep the plants in the greenhouse, around the clock. As you can see from the Netatmo screenshots from below, the morning temperature outside was 1,7°C, but with the help of our heater (BioGreen Palma Digit, including Thermo 1 digital thermostat), the temperature inside greenhouse remained comfortable 12-13 degrees. The safety instructions for the heater say that there should be 40-50 cm empty space between the heater and our wooden plant crates, plus c. 1,5 meters empty space ahead, where the heater directs the hot air flow – this proved to be bit of a challenge in our small Juliana, but putting the heater on top of a metal chair for the night also the safety considerations have now worked out fine, I think. And chillies seem to like the move to outdoors, they get more light and the moist air of greenhouse is good for them, too. (Got an extra sapling from our kid’s school rummage sale – a Trinidad Scorpion Moruga Red; let’s see how that one turns out…)

image

image

image

image

image

image

Greenhouse: the water pipes

Today  the watering system of our greenhouse took some nice steps towards completion – the photos below pretty much tell the story, but: we installed a (Bauhaus) black plastic water barrel for temperature control purposes as well, a (Gardena) water tube system to deliver the water below greenhouse structures, and drilled couple of holes for the automatic Blumat watering system – This is still in “closed loop” mode, until the temperature is high enough for leaving plants permanently into the greenhouse. We tried to find a suitable electric heater from Tampere  but it seems no-one has such available.

image

image

image

image

image

image

image

Building a greenhouse, pt. 6. Ready?

The final part of setting up the Juliana Compact greenhouse kit involved fitting and fixing the actual glass parts. This was pretty simple and straightforward in theory: if the base structure is correct in every regard, then one just needs to place the tempered glass pieces into the right holes at the aluminium frame and lock them into place. In practice this was not quite so easy, of course. The sealing of glass into the frame requires using either silicone gun or weatherstripping (stips of soft thermoplastic rubber) to provide an elastic base, and then applying the plastic lock strips (“M strips”) to lock glass sheets into place. (The lock strip plastic hardens in low temperatures, so this was a rush against time – setting sun and dropping temperatures would make the installation impossible.) We decided to use the weatherstripping option, which proved to be a good choice – even while the base and aluminium frame appeared to be pretty straight, there was still need to carefully move each sheet of glass several times during their installation attempts, and this would have been really difficult to do with messy silicone hardening and complicating things up. We decided also not to use acetone or any other strong solvent to clean the aluminium strips of grease, even while Juliana’s instructions told so (we were tipped by an expert that acetone actually ruins the cover paint from the frame, so using it would be a bad idea).

The need for repeated moving and fine-tuning of each glass related to the final precision test required by the Juliana kit: the “M strips” used for locking glasses need suitable, c. 1 mm insets or slots that go down all the way on both sides of each glass sheet, otherwise the M strips do not lock into place. That evenly distributed one millimeter tolerance proved to be rather tough challenge to reach. In our case we got majority of glass sheets installed with only moderate trouble, but in few, last glass installations we had to use tricks like matchsticks as holders that kept glass in place, while two persons – working in sync – both gently twisted and pressed powerfully inwards two M lock strips at both sides of a glass sheet, moving from top towards bottom at even pace, so that the 1 mm gap remained evenly distributed at both sides even while M stips tended to press and move glass sheets sideways. There is a picture below that hopefully illustrates this – there needs to be a suitable gap between the aluminium profile and the edge of glass sheet, while the glass sheet must rest on top of the weatherstipping, that is fixed very close to the inner edge of aluminium profile. At one point we were simultaneously fine-tuning three large sheets of glass, holding them with one hand in place, while pressing the M strips into place. And we did it!

There are so many pitfalls waiting in both printed instruction guidelines and online Juliana guides that it is perhaps surprising that people actually manage to put these things together, in more or less satisfactory manner. Apparently many customers actually end up either calling the importer for help, or order a professional to set things up. Which might be a good idea. But: if you do all this yourself, it will be a real-life 3D spatial and problem-solving challenge and a good way to spend several days (or: weeks) of your precious free time – so why not enjoy it?

When the final sheet of glass was locked in place, it turned out that the door did not work properly any more (framework had tilted or shifted slightly during the glass installation, so that the door now slightly grinds against its frame when closed). But I do not care so much any more, no doubt we will find some solution to that also, eventually. I am already thinking of the next summer, and how to monitor temperature, humidity, and how to maintain the correct irrigation level in my chili pots. I have already the Blumat automatic watering system, and there is now also an extra wireless Netatmo sensor unit set up in the greenhouse for testing purposes, plus a solar cell powered led lights for some ambience and night time illumination of this “glass box”. – Thanks for reading, and I hope you have enjoyed your garden of summer, too!

20150912_162301

20150912_155711

20150912_153823

20150912_131936

20150912_131919

20150912_164850

20150912_180539

IMG_7204

IMG_7207

20150912_184705

20150912_190616

20150912_195023

20150912_205527

IMG_7209

Building a greenhouse, pt. 5

The actual greenhouse construction has been going on for some time now (myself again more in the assistant roles). I must admit that there are times when I am getting tired of the entire project, even if I am not even carrying the main burden. There are several issues in the Juliana greenhouse kit that make things more complex, confusing and difficult than they need to be. The instructions leaflet is one thing: it might be that all the aluminum parts are indeed painted black, but it is not optimal to print everything as black in the instructions with small details and bars with complex profiles. There is too much guesswork in the construction now. There are mysterious gaps in the instructions, where you just need to make a guess how to get from phase A to C,  and trial and error is not good in system that is put together with soft, aluminium nuts and bolts – fastening and loosening them just a couple of times can lead to threads of nuts breaking and bolts getting stuck. Also, if there is a gap between parts in one part of the aluminium framework, it is often very hard to figure out where the source of problem is, when there are dozens of parts that connect to each other like a giant ‘himmeli’. – But, we are making slow progress, pictures below.

image

image

image

image

image

image

image

image

image

image

image

image

image

image

image

image

image

Building a greenhouse, pt. 4

Today my role was more as an assistant – Laura is our resident IKEA construction expert, and even while there apparently was some unclear (or plain wrong) instructions in the Juliana guide sheet, the aluminium frame of our greenhouse was built in one day.